Top 10 Strategies to Dominate Dust 2: A Comprehensive Guide
Dust 2 is one of the most iconic maps in the world of Counter-Strike: Global Offensive, and mastering it is essential for any serious player. To dominate Dust 2, you must develop a deep understanding of its layout, strategies, and tactics. This guide outlines the top 10 strategies you can implement to elevate your gameplay. From communication with your teammates to mastering utility usage, these strategies will provide you with a solid foundation to control the map and secure victory.
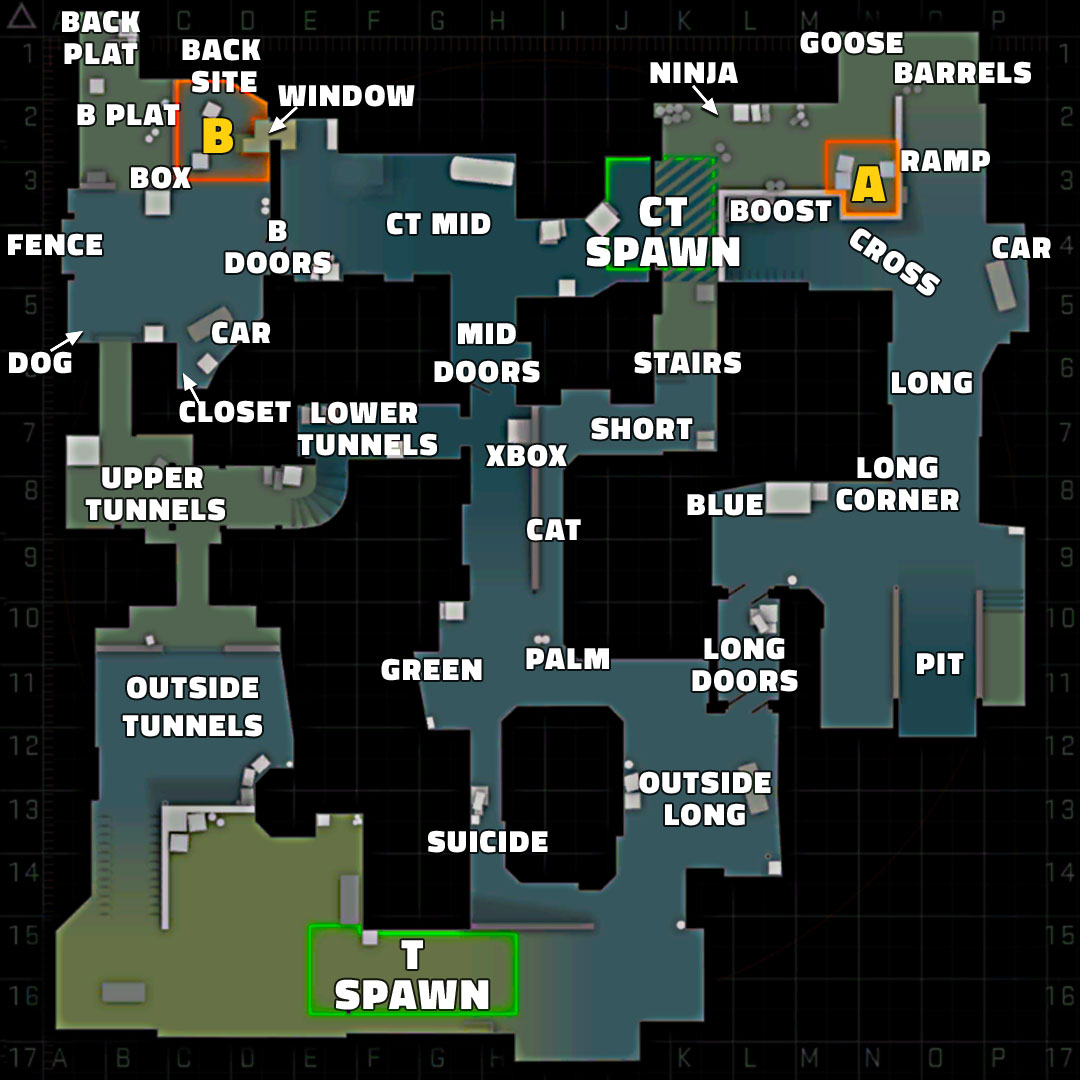
- Master the Callouts: Knowing the map's callouts is crucial for effective communication.
- Utilize Utility: Learn how to use grenades effectively to control choke points.
- Positioning: Always assume advantageous positions to surprise your opponents.
- Map Control: Control key areas like mid and A-site for better strategic options.
- Team Coordination: Always play as a team and strategize your approach.
- Economic Management: Manage your in-game economy for optimal weapon purchases.
- Aim Training: Regularly practice your aim to effectively win duels.
- Adapt Your Playstyle: Be ready to change tactics based on opponent strategies.
- Watch Pro Players: Observe professional matches to learn advanced strategies.
- Consistent Practice: Regular gameplay will help you familiarize yourself with Dust 2.
Counter-Strike is a popular first-person shooter game that has captivated millions of players around the world. For those looking to enhance their gaming experience, setting up a cs2 dedicated server can provide improved performance and control over the gaming environment.
Understanding Dust 2's Map Layout: Key Areas and Tactics
Understanding Dust 2's Map Layout is essential for players looking to improve their gameplay in Counter-Strike: Global Offensive. This map features a balanced design with distinct key areas that facilitate various tactical approaches. Familiarizing yourself with locations such as Bombsite A, Bombsite B, and the Middle is crucial. Here’s a quick overview of these areas:
- Bombsite A: Known for its tight corners and elevated positions, it requires strong teamwork and communication.
- Bombsite B: This site provides a more open space for defenders, making it essential to hold control effectively.
- Middle: A pivotal area for both teams, securing Middle can dictate the flow of the round.
To maximize your effectiveness on Dust 2, understanding key tactics associated with the map layout is vital. For instance, controlling Long A can provide your team with advantageous positions to retake or defend Bombsite A. Additionally, utilizing smoke grenades to block sightlines and executing quick rushes can surprise opponents. Furthermore, consider practicing eco rounds to master the economy system and learn when to buy weapons and utility. Mastering the intricacies of Dust 2’s layout and developing strategies tailored to its critical areas will elevate your gameplay and contribute significantly to your team's success.
How to Improve Your Aim and Movement on Dust 2: Tips from the Pros
Improving your aim and movement on Dust 2 can significantly elevate your gameplay. One of the first steps is to master your crosshair placement. Always keep your crosshair at head level where you anticipate enemy movement. This not only reduces the time you need to adjust your aim but also makes it easier to secure those critical headshots. Additionally, practice your spray control in offline matches or dedicated aim training maps. Start by learning the recoil pattern of your favorite weapons, like the AK-47 or M4A4, and practice pulling down your mouse in a controlled manner to counteract the gun's recoil.
Another vital aspect of movement is understanding the map and its choke points. On Dust 2, areas like Mid, B Tunnels, and A Long are hot spots where players often confront each other. Use strafing techniques when moving to make yourself a harder target to hit. Combining strafe movements with crouching can further throw off your opponent’s aim. Moreover, consider using the shift key to walk silently when approaching key positions, allowing you to gather intel without giving away your location. Remember, good movement not only ensures your survival but also positions you advantageously for engagements.